原创文章,转载请注明: 转载自慢慢的回味
本文链接地址: 使用VSCode 调试Apollo无人车代码
深入研究Apollo的代码是学习自动驾驶的很好途径。很多前沿科技,比如图像识别,激光雷达,多传感器融合,路径规划都可以直接完整的学习。能够直接调试代码是比读代码更能加深理解。本文就介绍怎么去调试Apollo的代码。

下载代码
系统使用Ubuntu 18.04版本。
https://gitee.com/ApolloAuto/apollo.git
比如目录为~/apollo。
安装Docker
curl -fsSL https://download.docker.com/linux/ubuntu/gpg | sudo gpg --dearmor -o /usr/share/keyrings/docker-archive-keyring.gpg echo "deb [arch=$(dpkg --print-architecture) signed-by=/usr/share/keyrings/docker-archive-keyring.gpg] https://download.docker.com/linux/ubuntu \ $(lsb_release -cs) stable" | sudo tee /etc/apt/sources.list.d/docker.list > /dev/null sudo apt-get update sudo apt-get install docker-ce docker-ce-cli containerd.io systemctl daemon-reload systemctl restart docker |
安装无线网卡驱动(可选)
因为笔者的网卡Ubuntu没有自带,需要自行安装驱动。
下载驱动:https://codeload.github.com/gnab/rtl8812au/zip/refs/heads/master
make dkms_install echo 8812au | sudo tee -a /etc/modules insmod 8812au.ko |
安装Nvidia驱动
本人的显卡为GTX1060。Apollo项目需要Nvidia显卡,否则大部分模块无法编译运行。
如下为安装显卡驱动的脚步程序。cuda安装后的路径可能有所不同。
sudo apt-get install linux-headers-$(uname -r) distribution=$(. /etc/os-release;echo $ID$VERSION_ID | sed -e 's/\.//g') wget https://developer.download.nvidia.com/compute/cuda/repos/$distribution/x86_64/cuda-$distribution.pin sudo mv cuda-$distribution.pin /etc/apt/preferences.d/cuda-repository-pin-600 #key的id可以会更新 https://developer.nvidia.com/blog/updating-the-cuda-linux-gpg-repository-key/ sudo apt-key adv --fetch-keys https://developer.download.nvidia.com/compute/cuda/repos/$distribution/x86_64/7fa2af80.pub echo "deb http://developer.download.nvidia.com/compute/cuda/repos/$distribution/x86_64 /" | sudo tee /etc/apt/sources.list.d/cuda.list sudo apt-get update sudo apt-get -y install cuda-drivers export PATH=$PATH:/usr/local/cuda-11.2/bin export LD_LIBRARY_PATH=$LD_LIBRARY_PATH:/usr/local/cuda-11.2/lib64:/usr/local/cuda/cuda/lib64 |
安装完成后,如下命令可以查看显卡信息。请确保cuda已正确安装。
nvidia-smi |
禁止自动更新内核来避免重新安装驱动
1 查看自己使用的内核
derek@ubuntu:~$ uname -a Linux ubuntu 5.4.0-150-generic #167~18.04.1-Ubuntu SMP Wed May 24 00:51:42 UTC 2023 x86_64 x86_64 x86_64 GNU/Linux |
2 查看目前安装的内核,并锁定它们
derek@ubuntu:~$ dpkg --get-selections|grep linux|grep 150 linux-headers-5.4.0-150-generic install linux-hwe-5.4-headers-5.4.0-150 install linux-image-5.4.0-150-generic install linux-modules-5.4.0-150-generic install linux-modules-extra-5.4.0-150-generic install derek@ubuntu:~$ sudo apt-mark hold linux-headers-5.4.0-150-generic linux-headers-5.4.0-150-generic set on hold. derek@ubuntu:~$ sudo apt-mark hold linux-hwe-5.4-headers-5.4.0-150 linux-hwe-5.4-headers-5.4.0-150 set on hold. derek@ubuntu:~$ sudo apt-mark hold linux-image-5.4.0-150-generic linux-image-5.4.0-150-generic set on hold. derek@ubuntu:~$ sudo apt-mark hold linux-modules-5.4.0-150-generic linux-modules-5.4.0-150-generic set on hold. derek@ubuntu:~$ sudo apt-mark hold linux-modules-extra-5.4.0-150-generic linux-modules-extra-5.4.0-150-generic set on hold derek@ubuntu:~$ dpkg --get-selections|grep linux|grep 150 linux-headers-5.4.0-150-generic hold linux-hwe-5.4-headers-5.4.0-150 hold linux-image-5.4.0-150-generic hold linux-modules-5.4.0-150-generic hold linux-modules-extra-5.4.0-150-generic hold |
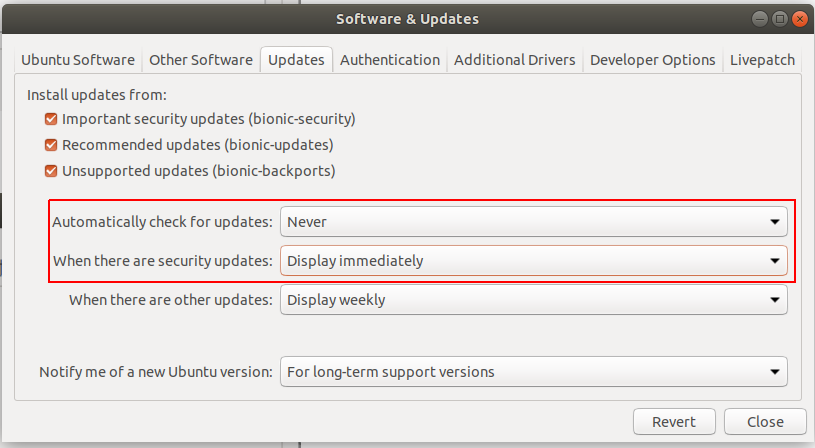
3 修改软件自动更新
修改如下2项
安装Nvidia Docker
Apollo需要运行在Docker预安装环境,以加快开发运行环境的统一性。
distribution=$(. /etc/os-release;echo $ID$VERSION_ID) && curl -s -L https://nvidia.github.io/nvidia-docker/gpgkey | sudo apt-key add - && curl -s -L https://nvidia.github.io/nvidia-docker/$distribution/nvidia-docker.list | sudo tee /etc/apt/sources.list.d/nvidia-docker.list sudo apt-get update sudo apt-get install -y nvidia-docker2 sudo systemctl restart docker |
安装完成后,可启动示例Dockers程序查看。
sudo docker run --rm --gpus all nvidia/cuda:11.0-base nvidia-smi |
启动Apollo项目
在源码目录~/apollo中,执行如下命令,进入Apollo Docker:
脚本会把源文件里面的目录以volumn的形式挂载进Docker环境。
./docker/scripts/dev_start.sh ./docker/scripts/dev_into.sh |
以后进入,直接启动已有的Docker即可:
docker ps -a docker start 671567b64765 ./docker/scripts/dev_into.sh |
调试一个车道线识别程序
创建一个Bazel编译配置:
~/apollo/modules/perception/camera/test/BUILD
内容为:
load("@rules_cc//cc:defs.bzl", "cc_library", "cc_test") load("//tools:cpplint.bzl", "cpplint") package(default_visibility = ["//visibility:public"]) cc_test( name = "camera_lib_lane_detector_darkscnn_lane_detector_test", size = "medium", srcs = ["camera_lib_lane_detector_darkscnn_lane_detector_test.cc"], deps = [ "//cyber", "//modules/perception/base", "//modules/perception/camera/lib/lane/detector/darkSCNN:darkSCNN_lane_detector", "//modules/perception/common/io:io_util", "@com_google_googletest//:gtest_main", "@opencv//:core", ], ) cpplint() |
现在可以编译Apollo程序了:
./apollo.sh build_dbg |
启动GDB Server,供Docker外面的VS Code进行远程调试:
export LD_LIBRARY_PATH=$LD_LIBRARY_PATH:/usr/local/libtorch_gpu/lib/ apt update apt install gdbserver gdbserver 127.0.0.1:2222 bazel-bin/modules/perception/camera/test/camera_lib_lane_detector_darkscnn_lane_detector_test |
启动VS Code,安装C++插件,然后点击Debug,添加如下配置即可调试Docker里面刚才启动的程序:(注意修改program的路径)
{ "version": "0.2.0", "configurations": [ { "name": "gdb Remote camera_lib_lane_postprocessor_darkscnn_lane_postprocessor_test", "type": "cppdbg", "request": "launch", "program": "~/apollo/.cache/bazel/540135163923dd7d5820f3ee4b306b32/execroot/apollo/bazel-out/k8-dbg/bin/modules/perception/camera/test/camera_lib_lane_detector_darkscnn_lane_detector_test", "args": ["myarg1", "myarg2", "myarg3"], "stopAtEntry": true, "environment": [], "externalConsole": false, "MIMode": "gdb", "miDebuggerPath": "gdb", "miDebuggerArgs": "gdb", "linux": { "MIMode": "gdb", "miDebuggerPath": "/usr/bin/gdb", "miDebuggerServerAddress": "127.0.0.1:2222", }, "logging": { "moduleLoad": false, "engineLogging": false, "trace": false }, "setupCommands": [ { "description": "Enable pretty-printing for gdb", "text": "-enable-pretty-printing", "ignoreFailures": true } ], "cwd": "${workspaceFolder}", } ] } |
Windows下使用VS Code Dev Container
Windows下使用VS Code Dev Container来调试也是比较方便的,Dev Container可以让你在Windows下的操作如同在Container里面。
在项目根目录创建文件:.devcontainer/Dockerfile
FROM registry.baidubce.com/apolloauto/apollo:dev-x86_64-18.04-20210914_1336 ENV SHELL /bin/bash |
在项目根目录创建文件:.devcontainer/devcontainer.json
{ "name": "Apollo Dev Container", "build": { "dockerfile": "./Dockerfile" }, "remoteUser": "root", //docker run -v apollo_map_volume-sunnyvale_big_loop_root:/apollo/modules/map/data/sunnyvale_big_loop --rm registry.baidubce.com/apolloauto/apollo:map_volume-sunnyvale_big_loop-latest true //docker run -v apollo_map_volume-sunnyvale_loop-latest:/apollo/modules/map/data/sunnyvale_loop --rm registry.baidubce.com/apolloauto/apollo:map_volume-sunnyvale_loop-latest true //docker run -v apollo_audio_volume_root:/apollo/modules/audio/data/ --rm registry.baidubce.com/apolloauto/apollo:data_volume-audio_model-x86_64-latest true "runArgs": [ "--privileged", "--net=host", "-v", "apollo_map_volume-sunnyvale_big_loop_root:/apollo/modules/map/data/sunnyvale_big_loop", "-v", "apollo_map_volume-sunnyvale_loop-latest:/apollo/modules/map/data/sunnyvale_loop", "-v", "apollo_audio_volume_root:/apollo/modules/audio/data/", "--env", "CROSS_PLATFORM=0", "--env", "USER=root", "--env", "DOCKER_USER=root", "--env", "DOCKER_USER_ID=0", "--env", "DOCKER_GRP=0", "--env", "DOCKER_GRP_ID=0", "--env", "DOCKER_IMG=apolloauto/apollo:dev-x86_64-18.04-20210914_1336", "--env", "USE_GPU_HOST=false", // Set to 'true' or 'false' depending on the script "--env", "NVIDIA_VISIBLE_DEVICES=all", "--env", "NVIDIA_DRIVER_CAPABILITIES=compute,video,graphics,utility", "--workdir", "/apollo", "--add-host", "in-dev-docker:127.0.0.1", "--add-host", "localhost:127.0.0.1", "--hostname", "in-dev-docker" ], "workspaceMount": "type=bind,source=${localWorkspaceFolder},target=/apollo", "customizations": { "vscode": { "settings.json": { "terminal.integrated.profiles.linux": { "bash": { "path": "/bin/bash" } } } } } } |
最后,安装上VS Code 的 Dev Container 插件后就可以 Open In Container 了。
本作品采用知识共享署名 4.0 国际许可协议进行许可。