原创文章,转载请注明: 转载自慢慢的回味
本文链接地址: Apollo无人车的消息流转
Apollo由无数的组件构成,每个组件独立运行,通过消息来进行相互依赖。每个组件构建在Cyber RT框架上,处理一组输入并产生其输出数椐。Launch 文件提供组件入口,DAG 文件配置组件依赖的消息输入等。
使用 Cyber RT 创建新的组件
要创建并启动一个算法组件,需要通过以下 4 个步骤:
– 初如化组件的目录结构
– 实现组件类
– 设置配置文件
– 启动组件
以cyber/examples/common_component_example目录下的样例程序为例:
– C++头文件: common_component_example.h
– C++源文件: common_component_example.cc
– Bazel 构建文件: BUILD
– DAG 文件: common.dag
– Launch 文件: common.launch
实现组件类
头文件
如何实现`common_component_example.h`:
– 继承 Component 类
– 定义自己的 `Init` 和 `Proc` 函数。Proc 需要指定输入数椐类型。
– 使用`CYBER_REGISTER_COMPONENT`宏定义把组件类注册成全局可用。
#include <memory> #include "cyber/component/component.h" #include "cyber/examples/proto/examples.pb.h" using apollo::cyber::Component; using apollo::cyber::ComponentBase; using apollo::cyber::examples::proto::Driver; class CommonComponentSample : public Component<Driver, Driver> { public: bool Init() override; bool Proc(const std::shared_ptr<Driver>& msg0, const std::shared_ptr<Driver>& msg1) override; }; CYBER_REGISTER_COMPONENT(CommonComponentSample) |
源文件
对于源文件 `common_component_example.cc`, `Init` 和 `Proc` 这两个函数需要实现。
#include "cyber/examples/common_component_example/common_component_example.h" bool CommonComponentSample::Init() { AINFO << "Commontest component init"; return true; } bool CommonComponentSample::Proc(const std::shared_ptr<Driver>& msg0, const std::shared_ptr<Driver>& msg1) { AINFO << "Start common component Proc [" << msg0->msg_id() << "] [" << msg1->msg_id() << "]"; return true; } |
创建 BUILD 文件
load("@rules_cc//cc:defs.bzl", "cc_binary", "cc_library") load("//tools:cpplint.bzl", "cpplint") package(default_visibility = ["//visibility:public"]) cc_binary( name = "libcommon_component_example.so", linkshared = True, linkstatic = False, deps = [":common_component_example_lib"], ) cc_library( name = "common_component_example_lib", srcs = ["common_component_example.cc"], hdrs = ["common_component_example.h"], visibility = ["//visibility:private"], deps = [ "//cyber", "//cyber/examples/proto:examples_cc_proto", ], ) cpplint() |
配置 DAG 文件
在 DAG 依赖配置文件 (例如 common.dag) 中配置如下项:
– Channel names: 输入 Channel 的名称
– Library path: 该组件生成的共享库路径
– Class name: 此组件类的名称
# Define all components in DAG streaming. module_config { module_library : "/apollo/bazel-bin/cyber/examples/common_component_example/libcommon_component_example.so" components { class_name : "CommonComponentSample" config { name : "common" readers { channel: "/apollo/prediction" } readers { channel: "/apollo/test" } } } } |
配置 Launch 启动文件
在 launch 启动文件中 (`common.launch`), 配置下面的项:
– 组件的名字
– 上一步配置的 DAG 文件路径
– 运行组件时的进程名
<cyber> <component> <name>common</name> <dag_conf>/apollo/cyber/examples/common_component_example/common.dag</dag_conf> <process_name>common</process_name> </component> </cyber> |
这样一个简单的组件就完成了。
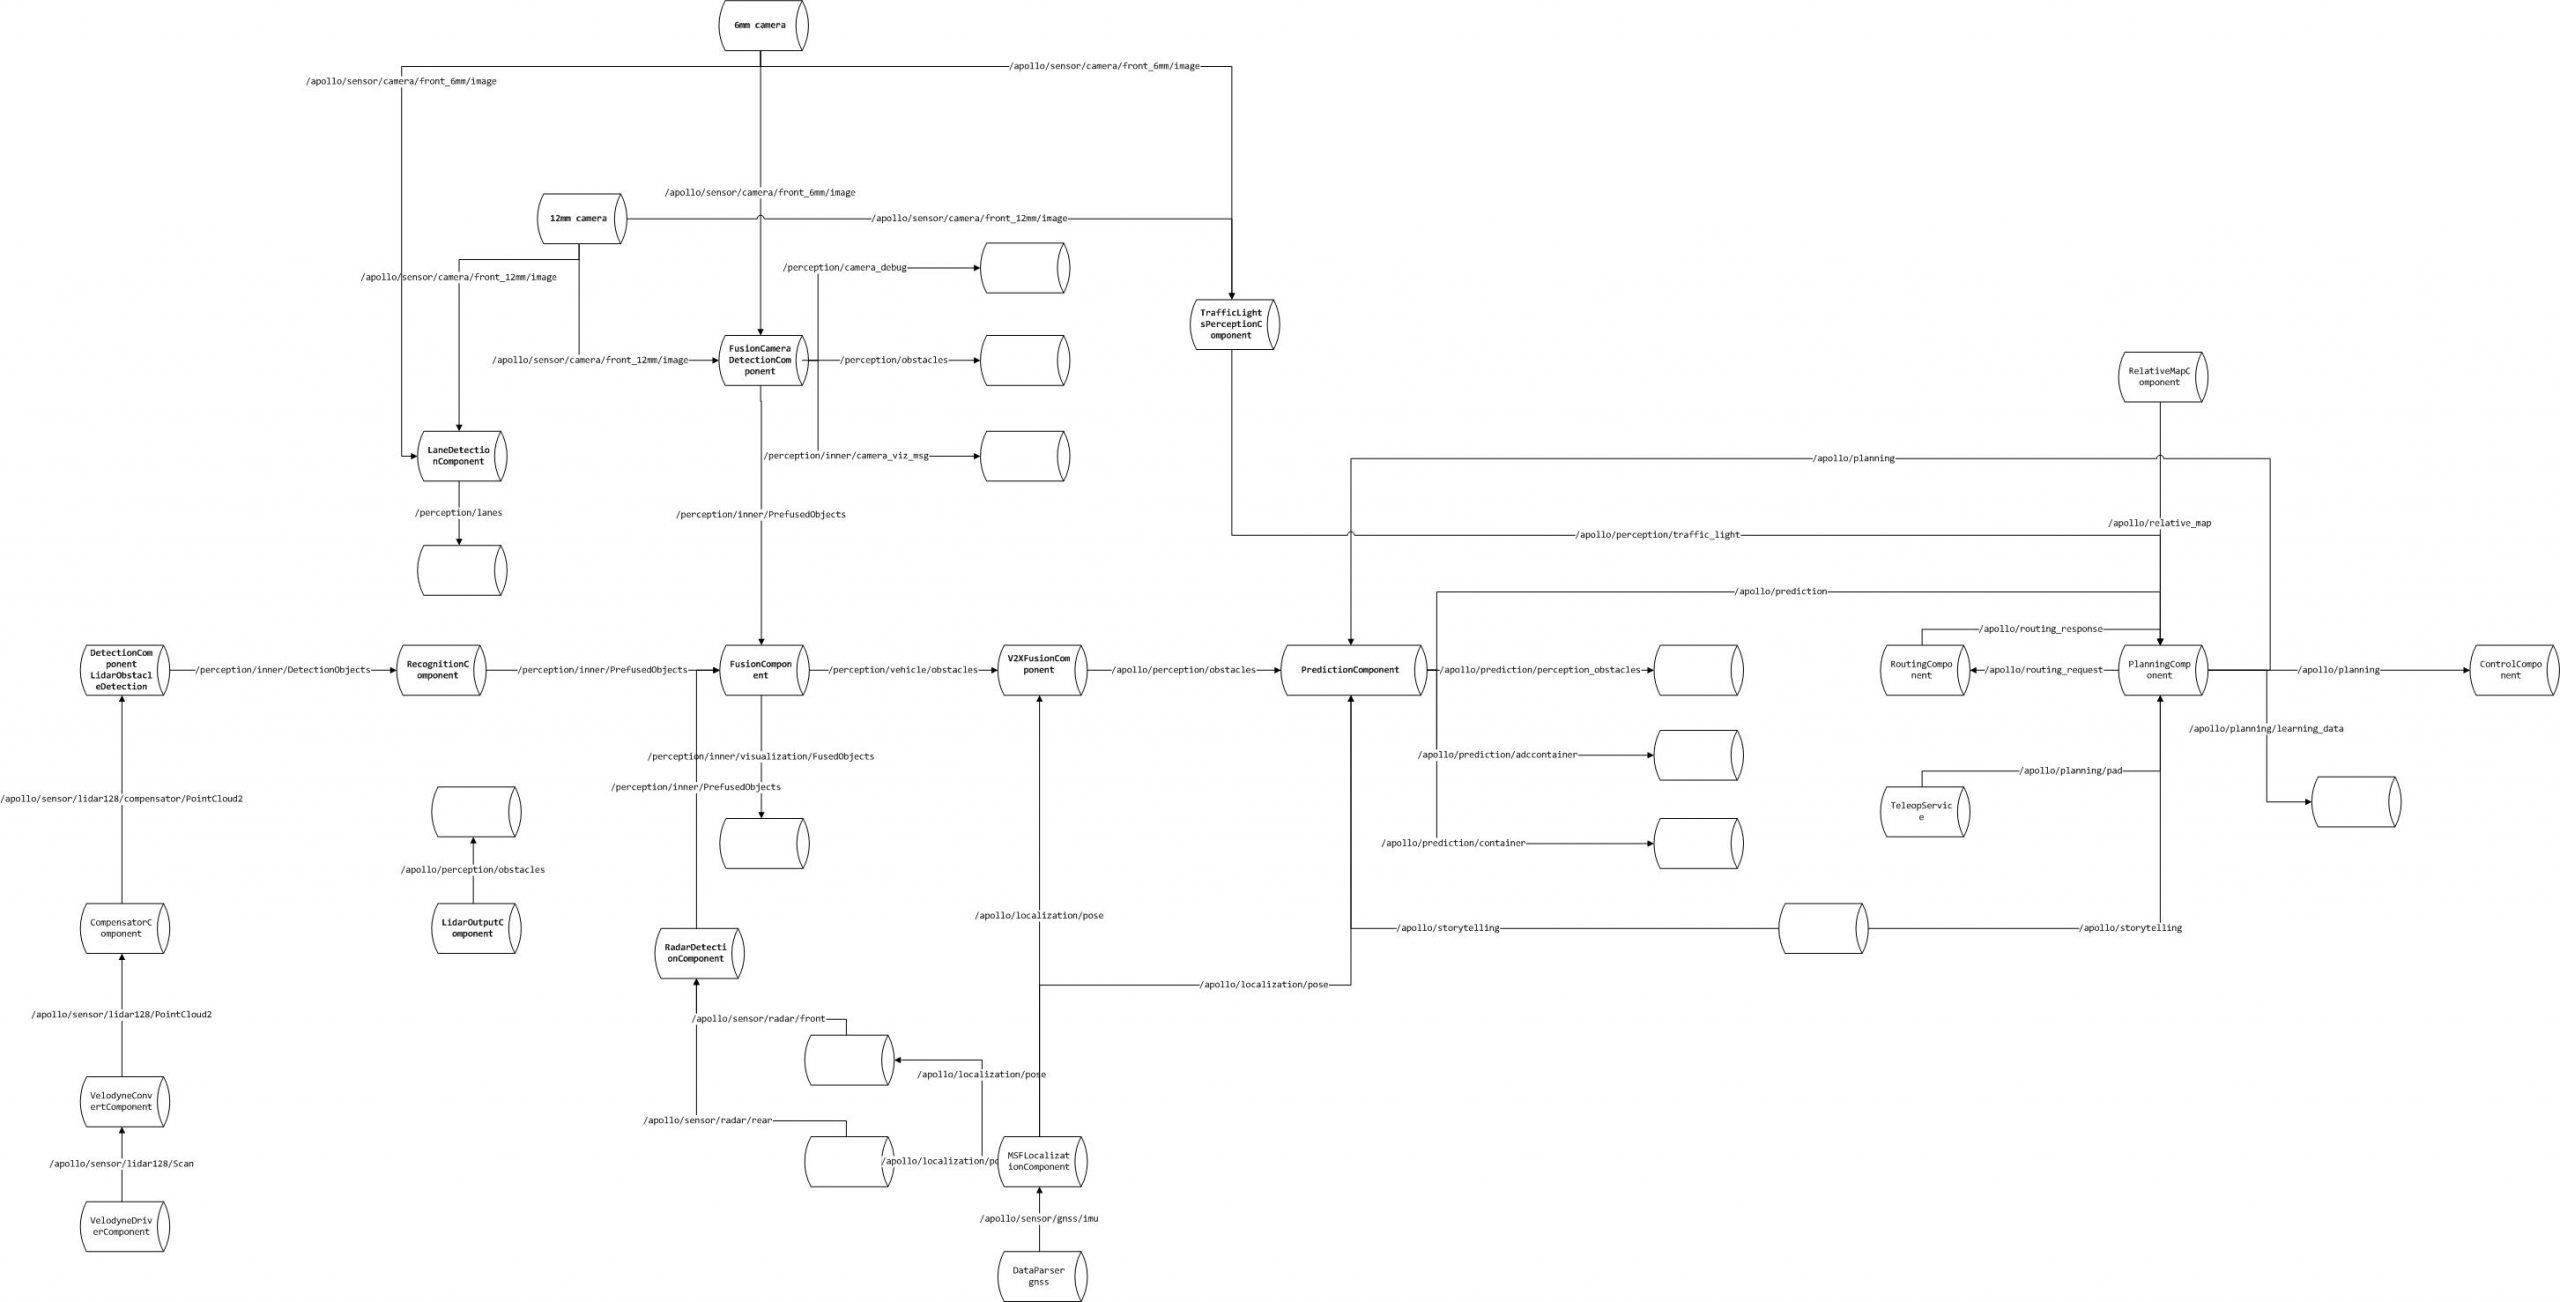
Apollo的消息流转
一图胜千言,消息从图的左边,上边向右流转。左边是激光雷达组件,上边是摄像头组件,两者融合后向右流转到预测组件,最后输送给右边的规划组件。从而输出轨迹到控制组件。
本作品采用知识共享署名 4.0 国际许可协议进行许可。