这次在Centos 8环境下搭建单节点Kubernetes环境用于日常的开发。区别于搭建高可用Kubernetes集群的是:系统升级为Centos 8;控制面为单节点;工作节点也只有一个。
系统规划
系统:CentOS-8.4.2105-x86_64
网络:Master节点 192.168.0.180;Worker节点:192.168.0.181
Kubernetes:1.23.1
kubeadm:1.23.1
Docker:20.10.9
准备工作
因为后面使用到的软件大部分需要科学上网。所以可以从阿里云香港区域购买一个Linux的主机,按量付费就可以。比如公网IP为47.52.220.100。
然后使用pproxy开启代理服务器:
pip3 install pproxy
pproxy -l http://0.0.0.0:8070 -r ssh://47.52.220.100/#root:password –v
这样代理服务器就在8070端口开放了。
安装基础服务器
安装所有需要的软件,后面的服务器只需要从它拷贝就可以了。
虚拟机安装Centos8
网卡需要选择桥接模式。
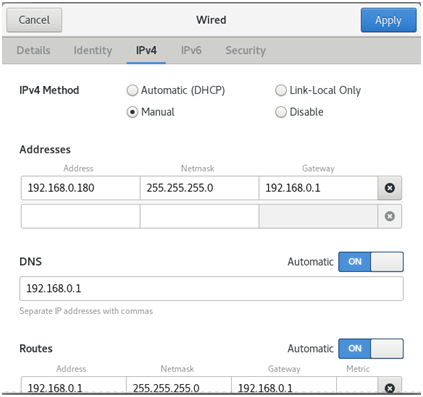
安装后手动设置IP,不要用DHCP
前置检查与配置
1 关闭防火墙,不然配置防火墙太麻烦。
2 关闭SELinux。
3 确保每个节点上 MAC 地址和 product_uuid 的唯一性。
4 禁用交换分区。为了保证 kubelet 正常工作,你 必须 禁用交换分区。
5 开启IP转发。
#!/bin/bash

echo "###############################################"
echo "Please ensure your OS is CentOS8 64 bits"
echo "Please ensure your machine has full network connection and internet access"
echo "Please ensure run this script with root user"

# Check hostname, Mac addr and product_uuid
echo "###############################################"
echo "Please check hostname as below:"
uname -a
# Set hostname if want
#hostnamectl set-hostname k8s-master

echo "###############################################"
echo "Please check Mac addr and product_uuid as below:"
ip link
cat /sys/class/dmi/id/product_uuid

echo "###############################################"
echo "Please check default route:"
ip route show

# Stop firewalld
echo "###############################################"
echo "Stop firewalld"
sudo systemctl stop firewalld
sudo systemctl disable firewalld

# Disable SELinux
echo "###############################################"
echo "Disable SELinux"
sudo getenforce

sudo setenforce 0
sudo cp -p /etc/selinux/config /etc/selinux/config.bak$(date '+%Y%m%d%H%M%S')
sudo sed -i "s/SELINUX=enforcing/SELINUX=disabled/g" /etc/selinux/config

sudo getenforce

# Turn off Swap
echo "###############################################"
echo "Turn off Swap"
free -m
sudo cat /proc/swaps

sudo swapoff -a

sudo cp -p /etc/fstab /etc/fstab.bak$(date '+%Y%m%d%H%M%S')
sudo sed -i "s/\/dev\/mapper\/rhel-swap/\#\/dev\/mapper\/rhel-swap/g" /etc/fstab
sudo sed -i "s/\/dev\/mapper\/centos-swap/\#\/dev\/mapper\/centos-swap/g" /etc/fstab
sudo sed -i "s/\/dev\/mapper\/cl-swap/\#\/dev\/mapper\/cl-swap/g" /etc/fstab
sudo mount -a

free -m
sudo cat /proc/swaps

# Setup iptables (routing)
echo "###############################################"
echo "Setup iptables (routing)"
sudo cat <<EOF >  /etc/sysctl.d/k8s.conf
net.bridge.bridge-nf-call-ip6tables = 1
net.bridge.bridge-nf-call-iptables = 1
net.bridge.bridge-nf-call-arptables = 1
net.ipv4.ip_forward = 1
EOF

sudo sysctl --system
iptables -P FORWARD ACCEPT

# Check ports
echo "###############################################"
echo "Check API server port(s)"
netstat -nlp | grep "8080\|6443"

echo "Check ETCD port(s)"
netstat -nlp | grep "2379\|2380"

echo "Check port(s): kublet, kube-scheduler, kube-controller-manager"
netstat -nlp | grep "10250\|10251\|10252" |
#!/bin/bash
echo "###############################################"
echo "Please ensure your OS is CentOS8 64 bits"
echo "Please ensure your machine has full network connection and internet access"
echo "Please ensure run this script with root user"
# Check hostname, Mac addr and product_uuid
echo "###############################################"
echo "Please check hostname as below:"
uname -a
# Set hostname if want
#hostnamectl set-hostname k8s-master
echo "###############################################"
echo "Please check Mac addr and product_uuid as below:"
ip link
cat /sys/class/dmi/id/product_uuid
echo "###############################################"
echo "Please check default route:"
ip route show
# Stop firewalld
echo "###############################################"
echo "Stop firewalld"
sudo systemctl stop firewalld
sudo systemctl disable firewalld
# Disable SELinux
echo "###############################################"
echo "Disable SELinux"
sudo getenforce
sudo setenforce 0
sudo cp -p /etc/selinux/config /etc/selinux/config.bak$(date '+%Y%m%d%H%M%S')
sudo sed -i "s/SELINUX=enforcing/SELINUX=disabled/g" /etc/selinux/config
sudo getenforce
# Turn off Swap
echo "###############################################"
echo "Turn off Swap"
free -m
sudo cat /proc/swaps
sudo swapoff -a
sudo cp -p /etc/fstab /etc/fstab.bak$(date '+%Y%m%d%H%M%S')
sudo sed -i "s/\/dev\/mapper\/rhel-swap/\#\/dev\/mapper\/rhel-swap/g" /etc/fstab
sudo sed -i "s/\/dev\/mapper\/centos-swap/\#\/dev\/mapper\/centos-swap/g" /etc/fstab
sudo sed -i "s/\/dev\/mapper\/cl-swap/\#\/dev\/mapper\/cl-swap/g" /etc/fstab
sudo mount -a
free -m
sudo cat /proc/swaps
# Setup iptables (routing)
echo "###############################################"
echo "Setup iptables (routing)"
sudo cat <<EOF > /etc/sysctl.d/k8s.conf
net.bridge.bridge-nf-call-ip6tables = 1
net.bridge.bridge-nf-call-iptables = 1
net.bridge.bridge-nf-call-arptables = 1
net.ipv4.ip_forward = 1
EOF
sudo sysctl --system
iptables -P FORWARD ACCEPT
# Check ports
echo "###############################################"
echo "Check API server port(s)"
netstat -nlp | grep "8080\|6443"
echo "Check ETCD port(s)"
netstat -nlp | grep "2379\|2380"
echo "Check port(s): kublet, kube-scheduler, kube-controller-manager"
netstat -nlp | grep "10250\|10251\|10252"
安装Docker
卸载掉旧的docker,安装我们需要的版本。
#!/bin/bash

set -e

# Uninstall installed docker
sudo yum remove -y docker \
                  docker-client \
                  docker-client-latest \
                  docker-common \
                  docker-latest \
                  docker-latest-logrotate \
                  docker-logrotate \
                  docker-selinux \
                  docker-engine-selinux \
                  docker-engine \
                  runc
# If you need set proxy, append one line
#vi /etc/yum.conf
#proxy=http://192.168.0.105:8070


# Set up repository
sudo yum install -y yum-utils device-mapper-persistent-data lvm2

# Use Aliyun Docker
sudo yum-config-manager --add-repo http://mirrors.aliyun.com/docker-ce/linux/centos/docker-ce.repo

# Install a validated docker version
sudo yum install -y docker-ce-20.10.9 docker-ce-cli-20.10.9 containerd.io-1.4.12

# Setup Docker daemon https://kubernetes.io/zh/docs/setup/production-environment/container-runtimes/#docker
mkdir -p /etc/docker

sudo cat <<EOF | sudo tee /etc/docker/daemon.json
{
  "exec-opts": ["native.cgroupdriver=systemd"],
  "log-driver": "json-file",
  "log-opts": {
    "max-size": "100m"
  },
  "storage-driver": "overlay2"
}
EOF

sudo mkdir -p /etc/systemd/system/docker.service.d

# Run Docker as systemd service
sudo systemctl daemon-reload
sudo systemctl enable docker
sudo systemctl start docker

# Check Docker version
docker version |
#!/bin/bash
set -e
# Uninstall installed docker
sudo yum remove -y docker \
docker-client \
docker-client-latest \
docker-common \
docker-latest \
docker-latest-logrotate \
docker-logrotate \
docker-selinux \
docker-engine-selinux \
docker-engine \
runc
# If you need set proxy, append one line
#vi /etc/yum.conf
#proxy=http://192.168.0.105:8070
# Set up repository
sudo yum install -y yum-utils device-mapper-persistent-data lvm2
# Use Aliyun Docker
sudo yum-config-manager --add-repo http://mirrors.aliyun.com/docker-ce/linux/centos/docker-ce.repo
# Install a validated docker version
sudo yum install -y docker-ce-20.10.9 docker-ce-cli-20.10.9 containerd.io-1.4.12
# Setup Docker daemon https://kubernetes.io/zh/docs/setup/production-environment/container-runtimes/#docker
mkdir -p /etc/docker
sudo cat <<EOF | sudo tee /etc/docker/daemon.json
{
"exec-opts": ["native.cgroupdriver=systemd"],
"log-driver": "json-file",
"log-opts": {
"max-size": "100m"
},
"storage-driver": "overlay2"
}
EOF
sudo mkdir -p /etc/systemd/system/docker.service.d
# Run Docker as systemd service
sudo systemctl daemon-reload
sudo systemctl enable docker
sudo systemctl start docker
# Check Docker version
docker version
安装Kubernetes
#!/bin/bash

set -e

sudo cat <<EOF > /etc/yum.repos.d/kubernetes.repo
[kubernetes]
name=Kubernetes
baseurl=https://mirrors.aliyun.com/kubernetes/yum/repos/kubernetes-el7-x86_64/
enabled=1
gpgcheck=1
repo_gpgcheck=1
gpgkey=https://mirrors.aliyun.com/kubernetes/yum/doc/yum-key.gpg https://mirrors.aliyun.com/kubernetes/yum/doc/rpm-package-key.gpg
EOF

yum clean all
yum makecache -y
yum repolist all

setenforce 0

sudo yum install -y kubelet-1.23.1 kubeadm-1.23.1 kubectl-1.23.1 --disableexcludes=kubernetes

# Check installed Kubernetes packages
sudo yum list installed | grep kube

sudo systemctl daemon-reload
sudo systemctl enable kubelet
sudo systemctl start kubelet |
#!/bin/bash
set -e
sudo cat <<EOF > /etc/yum.repos.d/kubernetes.repo
[kubernetes]
name=Kubernetes
baseurl=https://mirrors.aliyun.com/kubernetes/yum/repos/kubernetes-el7-x86_64/
enabled=1
gpgcheck=1
repo_gpgcheck=1
gpgkey=https://mirrors.aliyun.com/kubernetes/yum/doc/yum-key.gpg https://mirrors.aliyun.com/kubernetes/yum/doc/rpm-package-key.gpg
EOF
yum clean all
yum makecache -y
yum repolist all
setenforce 0
sudo yum install -y kubelet-1.23.1 kubeadm-1.23.1 kubectl-1.23.1 --disableexcludes=kubernetes
# Check installed Kubernetes packages
sudo yum list installed | grep kube
sudo systemctl daemon-reload
sudo systemctl enable kubelet
sudo systemctl start kubelet
提前下载Docker镜像
包括Kubernetes和Calico网络插件镜像。
mkdir -p /etc/systemd/system/docker.service.d
vi /etc/systemd/system/docker.service.d/http-proxy.conf
#加入如下配置
[Service]
Environment="HTTP_PROXY=http://192.168.0.105:8070" "HTTPS_PROXY=http://192.168.0.105:8070" "NO_PROXY=localhost,127.0.0.1,registry.example.com"

#重载配置并重启dockers服务
systemctl daemon-reload
systemctl restart docker |
mkdir -p /etc/systemd/system/docker.service.d
vi /etc/systemd/system/docker.service.d/http-proxy.conf
#加入如下配置
[Service]
Environment="HTTP_PROXY=http://192.168.0.105:8070" "HTTPS_PROXY=http://192.168.0.105:8070" "NO_PROXY=localhost,127.0.0.1,registry.example.com"
#重载配置并重启dockers服务
systemctl daemon-reload
systemctl restart docker
#!/bin/bash

# Run `kubeadm config images list` to check required images
# Check version in https://kubernetes.io/docs/reference/setup-tools/kubeadm/kubeadm-init/
# Search "Running kubeadm without an internet connection"
# For running kubeadm without an internet connection you have to pre-pull the required master images for the version of choice:
KUBE_VERSION=v1.23.1
KUBE_PAUSE_VERSION=3.6
ETCD_VERSION=3.5.1-0
CORE_DNS_VERSION=1.8.6

# In Kubernetes 1.12 and later, the k8s.gcr.io/kube-*, k8s.gcr.io/etcd and k8s.gcr.io/pause images don’t require an -${ARCH} suffix
images=(kube-proxy:${KUBE_VERSION}
kube-scheduler:${KUBE_VERSION}
kube-controller-manager:${KUBE_VERSION}
kube-apiserver:${KUBE_VERSION}
pause:${KUBE_PAUSE_VERSION}
etcd:${ETCD_VERSION})

for imageName in ${images[@]} ; do
  docker pull k8s.gcr.io/$imageName
done
docker pull coredns/coredns:${CORE_DNS_VERSION}

docker images

docker pull calico/cni:v3.21.2
docker pull calico/pod2daemon-flexvol:v3.21.2
docker pull calico/node:v3.21.2
docker pull calico/kube-controllers:v3.21.2

docker images | grep calico |
#!/bin/bash
# Run `kubeadm config images list` to check required images
# Check version in https://kubernetes.io/docs/reference/setup-tools/kubeadm/kubeadm-init/
# Search "Running kubeadm without an internet connection"
# For running kubeadm without an internet connection you have to pre-pull the required master images for the version of choice:
KUBE_VERSION=v1.23.1
KUBE_PAUSE_VERSION=3.6
ETCD_VERSION=3.5.1-0
CORE_DNS_VERSION=1.8.6
# In Kubernetes 1.12 and later, the k8s.gcr.io/kube-*, k8s.gcr.io/etcd and k8s.gcr.io/pause images don’t require an -${ARCH} suffix
images=(kube-proxy:${KUBE_VERSION}
kube-scheduler:${KUBE_VERSION}
kube-controller-manager:${KUBE_VERSION}
kube-apiserver:${KUBE_VERSION}
pause:${KUBE_PAUSE_VERSION}
etcd:${ETCD_VERSION})
for imageName in ${images[@]} ; do
docker pull k8s.gcr.io/$imageName
done
docker pull coredns/coredns:${CORE_DNS_VERSION}
docker images
docker pull calico/cni:v3.21.2
docker pull calico/pod2daemon-flexvol:v3.21.2
docker pull calico/node:v3.21.2
docker pull calico/kube-controllers:v3.21.2
docker images | grep calico
配置Master节点
拷贝一份上面的基础镜像,命名为k8s-master,同时修改hostname。
echo "192.168.0.180    k8s-master" >> /etc/hosts
echo "192.168.0.181 k8s-worker" >> /etc/hosts |
echo "192.168.0.180 k8s-master" >> /etc/hosts
echo "192.168.0.181 k8s-worker" >> /etc/hosts
初始化集群服务器
#!/bin/bash

set -e

# Reset firstly if ran kubeadm init before
kubeadm reset -f

# kubeadm init with calico network
CONTROL_PLANE_ENDPOINT="192.168.0.180:6443"

kubeadm init \
  --kubernetes-version=v1.23.1 \
  --control-plane-endpoint=${CONTROL_PLANE_ENDPOINT} \
  --service-cidr=10.96.0.0/16 \
  --pod-network-cidr=10.244.0.0/16 \
  --upload-certs

# Make kubectl works
mkdir -p $HOME/.kube
sudo cp /etc/kubernetes/admin.conf $HOME/.kube/config
sudo chown $(id -u):$(id -g) $HOME/.kube/config

cp -p $HOME/.bash_profile $HOME/.bash_profile.bak$(date '+%Y%m%d%H%M%S')
echo "export KUBECONFIG=$HOME/.kube/config" >> $HOME/.bash_profile
source $HOME/.bash_profile

# Get cluster information
kubectl cluster-info |
#!/bin/bash
set -e
# Reset firstly if ran kubeadm init before
kubeadm reset -f
# kubeadm init with calico network
CONTROL_PLANE_ENDPOINT="192.168.0.180:6443"
kubeadm init \
--kubernetes-version=v1.23.1 \
--control-plane-endpoint=${CONTROL_PLANE_ENDPOINT} \
--service-cidr=10.96.0.0/16 \
--pod-network-cidr=10.244.0.0/16 \
--upload-certs
# Make kubectl works
mkdir -p $HOME/.kube
sudo cp /etc/kubernetes/admin.conf $HOME/.kube/config
sudo chown $(id -u):$(id -g) $HOME/.kube/config
cp -p $HOME/.bash_profile $HOME/.bash_profile.bak$(date '+%Y%m%d%H%M%S')
echo "export KUBECONFIG=$HOME/.kube/config" >> $HOME/.bash_profile
source $HOME/.bash_profile
# Get cluster information
kubectl cluster-info
记录上面脚本输出中的kubeadm join 内容,后面用。
如果忘记了kubeadm join命令的内容,可运行kubeadm token create –print-join-command重新获取,并可运行kubeadm init phase upload-certs –upload-certs获取新的certificate-key。
当然,现在集群还没有工作,你会发现coredns还是Pending,那是因为我们没有安装CNI插件。
[root@k8s-master ~]# kubectl get pods --all-namespaces
NAMESPACE     NAME                                 READY   STATUS    RESTARTS   AGE
kube-system   coredns-64897985d-p46b8              0/1     Pending   0          4m12s
kube-system   coredns-64897985d-tbdxl              0/1     Pending   0          4m12s
kube-system   etcd-k8s-master                      1/1     Running   1          4m27s
kube-system   kube-apiserver-k8s-master            1/1     Running   1          4m26s
kube-system   kube-controller-manager-k8s-master   1/1     Running   1          4m27s
kube-system   kube-proxy-dwj6v                     1/1     Running   0          52s
kube-system   kube-proxy-nszmz                     1/1     Running   0          4m13s
kube-system kube-scheduler-k8s-master 1/1 Running 1 4m26s |
[root@k8s-master ~]# kubectl get pods --all-namespaces
NAMESPACE NAME READY STATUS RESTARTS AGE
kube-system coredns-64897985d-p46b8 0/1 Pending 0 4m12s
kube-system coredns-64897985d-tbdxl 0/1 Pending 0 4m12s
kube-system etcd-k8s-master 1/1 Running 1 4m27s
kube-system kube-apiserver-k8s-master 1/1 Running 1 4m26s
kube-system kube-controller-manager-k8s-master 1/1 Running 1 4m27s
kube-system kube-proxy-dwj6v 1/1 Running 0 52s
kube-system kube-proxy-nszmz 1/1 Running 0 4m13s
kube-system kube-scheduler-k8s-master 1/1 Running 1 4m26s
安装网络插件
#!/bin/bash

set -e

wget -O calico.yaml https://docs.projectcalico.org/v3.21/manifests/calico.yaml

kubectl apply -f calico.yaml

# Wait a while to let network takes effect
sleep 30

# Check daemonset
kubectl get ds -n kube-system -l k8s-app=calico-node

# Check pod status and ready
kubectl get pods -n kube-system -l k8s-app=calico-node

# Check apiservice status
kubectl get apiservice v1.crd.projectcalico.org -o yaml |
#!/bin/bash
set -e
wget -O calico.yaml https://docs.projectcalico.org/v3.21/manifests/calico.yaml
kubectl apply -f calico.yaml
# Wait a while to let network takes effect
sleep 30
# Check daemonset
kubectl get ds -n kube-system -l k8s-app=calico-node
# Check pod status and ready
kubectl get pods -n kube-system -l k8s-app=calico-node
# Check apiservice status
kubectl get apiservice v1.crd.projectcalico.org -o yaml
现在,所有Pod状态都正常了。
NAMESPACE     NAME                                       READY   STATUS    RESTARTS   AGE     IP               NODE         NOMINATED NODE   READINESS GATES
kube-system   calico-kube-controllers-647d84984b-gmlhv   1/1     Running   0          67s     10.244.254.131   k8s-worker
kube-system   calico-node-bj8nn                          1/1     Running   0          67s     192.168.0.181    k8s-worker
kube-system   calico-node-m77mk                          1/1     Running   0          67s     192.168.0.180    k8s-master
kube-system   coredns-64897985d-p46b8                    1/1     Running   0          12m     10.244.254.130   k8s-worker
kube-system   coredns-64897985d-tbdxl                    1/1     Running   0          12m     10.244.254.129   k8s-worker
kube-system   etcd-k8s-master                            1/1     Running   1          12m     192.168.0.180    k8s-master
kube-system   kube-apiserver-k8s-master                  1/1     Running   1          12m     192.168.0.180    k8s-master
kube-system   kube-controller-manager-k8s-master         1/1     Running   1          12m     192.168.0.180    k8s-master
kube-system   kube-proxy-dwj6v                           1/1     Running   0          8m49s   192.168.0.181    k8s-worker
kube-system   kube-proxy-nszmz                           1/1     Running   0          12m     192.168.0.180    k8s-master
kube-system   kube-scheduler-k8s-master                  1/1     Running   1          12m     192.168.0.180    k8s-master
安装MetalLB作为集群负载均衡提供者
https://metallb.universe.tf/installation/
修改strictARP的值:
kubectl edit configmap -n kube-system kube-proxy
apiVersion: kubeproxy.config.k8s.io/v1alpha1
kind: KubeProxyConfiguration
mode: "ipvs"
ipvs:
strictARP: true |
apiVersion: kubeproxy.config.k8s.io/v1alpha1
kind: KubeProxyConfiguration
mode: "ipvs"
ipvs:
strictARP: true
下载并安装MetalLB:
export https_proxy=http://192.168.0.105:8070
export http_proxy=http://192.168.0.105:8070
wget https://raw.githubusercontent.com/metallb/metallb/v0.11.0/manifests/namespace.yaml
wget https://raw.githubusercontent.com/metallb/metallb/v0.11.0/manifests/metallb.yaml

export https_proxy=
export http_proxy=
kubectl apply -f namespace.yaml
kubectl apply -f metallb.yaml |
export https_proxy=http://192.168.0.105:8070
export http_proxy=http://192.168.0.105:8070
wget https://raw.githubusercontent.com/metallb/metallb/v0.11.0/manifests/namespace.yaml
wget https://raw.githubusercontent.com/metallb/metallb/v0.11.0/manifests/metallb.yaml
export https_proxy=
export http_proxy=
kubectl apply -f namespace.yaml
kubectl apply -f metallb.yaml
创建文件lb.yaml如下:
apiVersion: v1
kind: ConfigMap
metadata:
  namespace: metallb-system
  name: config
data:
  config: |
    address-pools:
    - name: default
      protocol: layer2
      addresses:
- 192.168.0.190-192.168.0.250 |
apiVersion: v1
kind: ConfigMap
metadata:
namespace: metallb-system
name: config
data:
config: |
address-pools:
- name: default
protocol: layer2
addresses:
- 192.168.0.190-192.168.0.250
然后apply是MetalLB生效:
kubectl apply -f lb.yaml
配置Workder节点
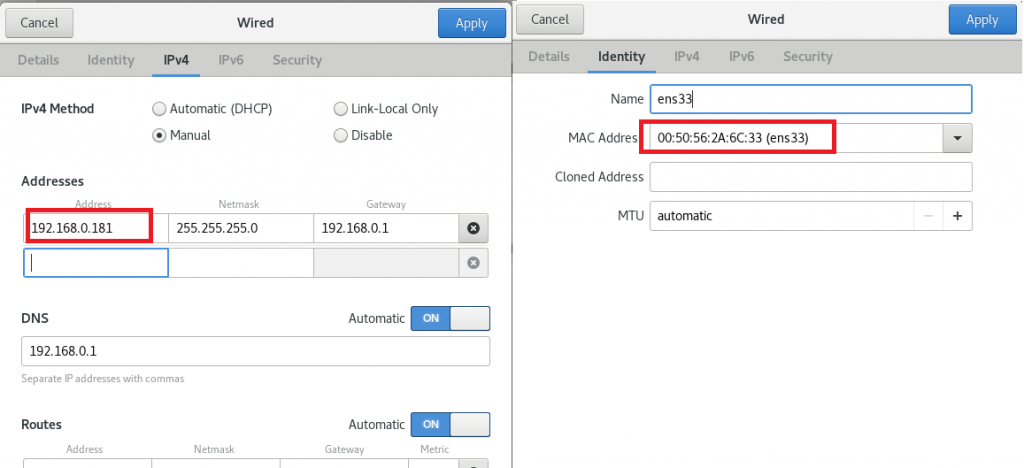
拷贝一份上面的基础镜像,命名为k8s-worker,同时修改hostname,注意修改Mac地址和IP地址。
echo "192.168.0.180    k8s-master" >> /etc/hosts
echo "192.168.0.181 k8s-worker" >> /etc/hosts |
echo "192.168.0.180 k8s-master" >> /etc/hosts
echo "192.168.0.181 k8s-worker" >> /etc/hosts
Workder节点到集群
运行kubeadm init中打印的日志中关于加入“worker node”的命令。
如果忘记了kubeadm join命令的内容,可运行kubeadm token create –print-join-command重新获取,并可运行kubeadm init phase upload-certs –upload-certs获取新的certificate-key。
kubeadm join 192.168.0.180:6443 --token srmce8.eonpa2amiwek1x0n \
--discovery-token-ca-cert-hash sha256:048c067f64ded80547d5c6acf2f9feda45d62c2fb02c7ab6da29d52b28eee1bb |
kubeadm join 192.168.0.180:6443 --token srmce8.eonpa2amiwek1x0n \
--discovery-token-ca-cert-hash sha256:048c067f64ded80547d5c6acf2f9feda45d62c2fb02c7ab6da29d52b28eee1bb
安装Dashboard
export https_proxy=http://192.168.0.105:8070
export http_proxy=http://192.168.0.105:8070
wget https://raw.githubusercontent.com/kubernetes/dashboard/v2.2.0/aio/deploy/recommended.yaml

export https_proxy=
export http_proxy=
kubectl apply -f recommended.yaml |
export https_proxy=http://192.168.0.105:8070
export http_proxy=http://192.168.0.105:8070
wget https://raw.githubusercontent.com/kubernetes/dashboard/v2.2.0/aio/deploy/recommended.yaml
export https_proxy=
export http_proxy=
kubectl apply -f recommended.yaml
创建文件dashboard-adminuser.yaml应用来添加管理员
---
apiVersion: v1
kind: ServiceAccount
metadata:
  name: admin-user
  namespace: kubernetes-dashboard

---
apiVersion: rbac.authorization.k8s.io/v1
kind: ClusterRoleBinding
metadata:
  name: admin-user
roleRef:
  apiGroup: rbac.authorization.k8s.io
  kind: ClusterRole
  name: cluster-admin
subjects:
- kind: ServiceAccount
  name: admin-user
namespace: kubernetes-dashboard |
---
apiVersion: v1
kind: ServiceAccount
metadata:
name: admin-user
namespace: kubernetes-dashboard
---
apiVersion: rbac.authorization.k8s.io/v1
kind: ClusterRoleBinding
metadata:
name: admin-user
roleRef:
apiGroup: rbac.authorization.k8s.io
kind: ClusterRole
name: cluster-admin
subjects:
- kind: ServiceAccount
name: admin-user
namespace: kubernetes-dashboard
然后执行下面命令后,拷贝输出的token来登录Dashboard:
kubectl apply -f dashboard-adminuser.yaml
kubectl -n kubernetes-dashboard describe secret $(kubectl -n kubernetes-dashboard get secret | grep admin-user | awk '{print $1}') |
kubectl apply -f dashboard-adminuser.yaml
kubectl -n kubernetes-dashboard describe secret $(kubectl -n kubernetes-dashboard get secret | grep admin-user | awk '{print $1}')
使用如下命令修改ClusterIP为LoadBalancer:
kubectl edit service -n kubernetes-dashboard kubernetes-dashboard |
kubectl edit service -n kubernetes-dashboard kubernetes-dashboard
查询服务kubernetes-dashboard,发现有外网IP地址了:
[root@k8s-master ~]# kubectl get service --all-namespaces
NAMESPACE              NAME                        TYPE           CLUSTER-IP      EXTERNAL-IP     PORT(S)                  AGE
default                kubernetes                  ClusterIP      10.96.0.1       <none>          443/TCP                  45m
kube-system            kube-dns                    ClusterIP      10.96.0.10      <none>          53/UDP,53/TCP,9153/TCP   45m
kubernetes-dashboard   dashboard-metrics-scraper   ClusterIP      10.96.46.101    <none>          8000/TCP                 11m
kubernetes-dashboard kubernetes-dashboard LoadBalancer 10.96.155.101 192.168.0.190 443:31019/TCP 11m |
[root@k8s-master ~]# kubectl get service --all-namespaces
NAMESPACE NAME TYPE CLUSTER-IP EXTERNAL-IP PORT(S) AGE
default kubernetes ClusterIP 10.96.0.1 <none> 443/TCP 45m
kube-system kube-dns ClusterIP 10.96.0.10 <none> 53/UDP,53/TCP,9153/TCP 45m
kubernetes-dashboard dashboard-metrics-scraper ClusterIP 10.96.46.101 <none> 8000/TCP 11m
kubernetes-dashboard kubernetes-dashboard LoadBalancer 10.96.155.101 192.168.0.190 443:31019/TCP 11m
现在可访问:https://192.168.0.190
安装Metrics Server
apiVersion: v1
kind: ServiceAccount
metadata:
  labels:
    k8s-app: metrics-server
  name: metrics-server
  namespace: kube-system
---
apiVersion: rbac.authorization.k8s.io/v1
kind: ClusterRole
metadata:
  labels:
    k8s-app: metrics-server
    rbac.authorization.k8s.io/aggregate-to-admin: "true"
    rbac.authorization.k8s.io/aggregate-to-edit: "true"
    rbac.authorization.k8s.io/aggregate-to-view: "true"
  name: system:aggregated-metrics-reader
rules:
- apiGroups:
  - metrics.k8s.io
  resources:
  - pods
  - nodes
  verbs:
  - get
  - list
  - watch
---
apiVersion: rbac.authorization.k8s.io/v1
kind: ClusterRole
metadata:
  labels:
    k8s-app: metrics-server
  name: system:metrics-server
rules:
- apiGroups:
  - ""
  resources:
  - pods
  - nodes
  - nodes/stats
  - namespaces
  - configmaps
  verbs:
  - get
  - list
  - watch
---
apiVersion: rbac.authorization.k8s.io/v1
kind: RoleBinding
metadata:
  labels:
    k8s-app: metrics-server
  name: metrics-server-auth-reader
  namespace: kube-system
roleRef:
  apiGroup: rbac.authorization.k8s.io
  kind: Role
  name: extension-apiserver-authentication-reader
subjects:
- kind: ServiceAccount
  name: metrics-server
  namespace: kube-system
---
apiVersion: rbac.authorization.k8s.io/v1
kind: ClusterRoleBinding
metadata:
  labels:
    k8s-app: metrics-server
  name: metrics-server:system:auth-delegator
roleRef:
  apiGroup: rbac.authorization.k8s.io
  kind: ClusterRole
  name: system:auth-delegator
subjects:
- kind: ServiceAccount
  name: metrics-server
  namespace: kube-system
---
apiVersion: rbac.authorization.k8s.io/v1
kind: ClusterRoleBinding
metadata:
  labels:
    k8s-app: metrics-server
  name: system:metrics-server
roleRef:
  apiGroup: rbac.authorization.k8s.io
  kind: ClusterRole
  name: system:metrics-server
subjects:
- kind: ServiceAccount
  name: metrics-server
  namespace: kube-system
---
apiVersion: v1
kind: Service
metadata:
  labels:
    k8s-app: metrics-server
  name: metrics-server
  namespace: kube-system
spec:
  ports:
  - name: https
    port: 443
    protocol: TCP
    targetPort: https
  selector:
    k8s-app: metrics-server
---
apiVersion: apps/v1
kind: Deployment
metadata:
  labels:
    k8s-app: metrics-server
  name: metrics-server
  namespace: kube-system
spec:
  selector:
    matchLabels:
      k8s-app: metrics-server
  strategy:
    rollingUpdate:
      maxUnavailable: 0
  template:
    metadata:
      labels:
        k8s-app: metrics-server
    spec:
      containers:
      - args:
        - --cert-dir=/tmp
        - --secure-port=4443
        - --kubelet-insecure-tls
        - --kubelet-preferred-address-types=InternalIP,ExternalIP,Hostname
        - --kubelet-use-node-status-port
        - --metric-resolution=15s
        image: k8s.gcr.io/metrics-server/metrics-server:v0.5.2
        imagePullPolicy: IfNotPresent
        livenessProbe:
          failureThreshold: 3
          httpGet:
            path: /livez
            port: https
            scheme: HTTPS
          periodSeconds: 10
        name: metrics-server
        ports:
        - containerPort: 4443
          name: https
          protocol: TCP
        readinessProbe:
          failureThreshold: 3
          httpGet:
            path: /readyz
            port: https
            scheme: HTTPS
          initialDelaySeconds: 20
          periodSeconds: 10
        resources:
          requests:
            cpu: 100m
            memory: 200Mi
        securityContext:
          readOnlyRootFilesystem: true
          runAsNonRoot: true
          runAsUser: 1000
        volumeMounts:
        - mountPath: /tmp
          name: tmp-dir
      nodeSelector:
        kubernetes.io/os: linux
      priorityClassName: system-cluster-critical
      serviceAccountName: metrics-server
      volumes:
      - emptyDir: {}
        name: tmp-dir
---
apiVersion: apiregistration.k8s.io/v1
kind: APIService
metadata:
  labels:
    k8s-app: metrics-server
  name: v1beta1.metrics.k8s.io
spec:
  group: metrics.k8s.io
  groupPriorityMinimum: 100
  insecureSkipTLSVerify: true
  service:
    name: metrics-server
    namespace: kube-system
  version: v1beta1
versionPriority: 100 |
apiVersion: v1
kind: ServiceAccount
metadata:
labels:
k8s-app: metrics-server
name: metrics-server
namespace: kube-system
---
apiVersion: rbac.authorization.k8s.io/v1
kind: ClusterRole
metadata:
labels:
k8s-app: metrics-server
rbac.authorization.k8s.io/aggregate-to-admin: "true"
rbac.authorization.k8s.io/aggregate-to-edit: "true"
rbac.authorization.k8s.io/aggregate-to-view: "true"
name: system:aggregated-metrics-reader
rules:
- apiGroups:
- metrics.k8s.io
resources:
- pods
- nodes
verbs:
- get
- list
- watch
---
apiVersion: rbac.authorization.k8s.io/v1
kind: ClusterRole
metadata:
labels:
k8s-app: metrics-server
name: system:metrics-server
rules:
- apiGroups:
- ""
resources:
- pods
- nodes
- nodes/stats
- namespaces
- configmaps
verbs:
- get
- list
- watch
---
apiVersion: rbac.authorization.k8s.io/v1
kind: RoleBinding
metadata:
labels:
k8s-app: metrics-server
name: metrics-server-auth-reader
namespace: kube-system
roleRef:
apiGroup: rbac.authorization.k8s.io
kind: Role
name: extension-apiserver-authentication-reader
subjects:
- kind: ServiceAccount
name: metrics-server
namespace: kube-system
---
apiVersion: rbac.authorization.k8s.io/v1
kind: ClusterRoleBinding
metadata:
labels:
k8s-app: metrics-server
name: metrics-server:system:auth-delegator
roleRef:
apiGroup: rbac.authorization.k8s.io
kind: ClusterRole
name: system:auth-delegator
subjects:
- kind: ServiceAccount
name: metrics-server
namespace: kube-system
---
apiVersion: rbac.authorization.k8s.io/v1
kind: ClusterRoleBinding
metadata:
labels:
k8s-app: metrics-server
name: system:metrics-server
roleRef:
apiGroup: rbac.authorization.k8s.io
kind: ClusterRole
name: system:metrics-server
subjects:
- kind: ServiceAccount
name: metrics-server
namespace: kube-system
---
apiVersion: v1
kind: Service
metadata:
labels:
k8s-app: metrics-server
name: metrics-server
namespace: kube-system
spec:
ports:
- name: https
port: 443
protocol: TCP
targetPort: https
selector:
k8s-app: metrics-server
---
apiVersion: apps/v1
kind: Deployment
metadata:
labels:
k8s-app: metrics-server
name: metrics-server
namespace: kube-system
spec:
selector:
matchLabels:
k8s-app: metrics-server
strategy:
rollingUpdate:
maxUnavailable: 0
template:
metadata:
labels:
k8s-app: metrics-server
spec:
containers:
- args:
- --cert-dir=/tmp
- --secure-port=4443
- --kubelet-insecure-tls
- --kubelet-preferred-address-types=InternalIP,ExternalIP,Hostname
- --kubelet-use-node-status-port
- --metric-resolution=15s
image: k8s.gcr.io/metrics-server/metrics-server:v0.5.2
imagePullPolicy: IfNotPresent
livenessProbe:
failureThreshold: 3
httpGet:
path: /livez
port: https
scheme: HTTPS
periodSeconds: 10
name: metrics-server
ports:
- containerPort: 4443
name: https
protocol: TCP
readinessProbe:
failureThreshold: 3
httpGet:
path: /readyz
port: https
scheme: HTTPS
initialDelaySeconds: 20
periodSeconds: 10
resources:
requests:
cpu: 100m
memory: 200Mi
securityContext:
readOnlyRootFilesystem: true
runAsNonRoot: true
runAsUser: 1000
volumeMounts:
- mountPath: /tmp
name: tmp-dir
nodeSelector:
kubernetes.io/os: linux
priorityClassName: system-cluster-critical
serviceAccountName: metrics-server
volumes:
- emptyDir: {}
name: tmp-dir
---
apiVersion: apiregistration.k8s.io/v1
kind: APIService
metadata:
labels:
k8s-app: metrics-server
name: v1beta1.metrics.k8s.io
spec:
group: metrics.k8s.io
groupPriorityMinimum: 100
insecureSkipTLSVerify: true
service:
name: metrics-server
namespace: kube-system
version: v1beta1
versionPriority: 100
本作品采用知识共享署名 4.0 国际许可协议进行许可。

